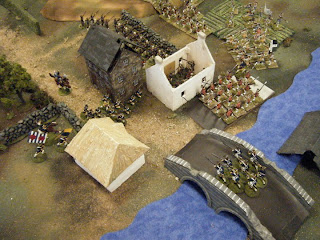
View of the town from the left
As usual, we had no idea how many players would actually show up for this, so the Student Prince was invited to lay out a defensive position without looking at the scenario book to see what the enemy's expect axis of advance might be. The Adelmann regiment was deployed to the left of the town, as viewed from the SB side of the river. The von Nordhafens deployed on the right side, with the artillery, and the Wachovian and SB hussars (1st squadrons of their notionally extended regiments) deployed to the far right.
Von Nordhafen regiment defending the town
Enemy in Sight!
Events showed the Pragmatic commander to have been foresighted. As the game opened in the late afternoon of the game day, a regiment of Rosish dragoons was sighted approaching the town. The Wachovians missed few opportunities to engage during the campaign, and this was no exception. The order was given to charge, to protect the lone gun on the Pragmatic side. It was considered likely that reducing the strength of the oncoming Rosish infantry by artillery fire was the only hope the Pragmatic troops had of holding the town, and it was therefore vital to keep the gun from being overrun immediately. A ferocious two turn melee resulted, which ended with the Hussars being eliminated as a fighting force, but taking the dragoons out of action for long enough that the action had moved to the streets of the town by the time they rallied, and they played no further part in the battle.
Hasty redeployment
As soon as it became clear that the enemy was concentrated on the right side of the town, the defenders quickly redeployed the Adelmann regiment.
I should note as a gamemaster that Ross and I were a little uncertain when we started this scenario just how long it should be to provide the appropriate level of challenge to the Rosish player. After consider the table size and the difference in movement rates between The War Game and Charge!, we finally agreed on a ten turn limit.
Adelmann Regiment meets the first attack
Once the opening cavalry action was concluded, the remainder of the battle consisted of the attack of the Rosish infantry. From the Pragmatic point of view, the Adelmann regiment was engaged in a series of desperate melees on the right flank around the approaches to the bridge, and the von Nordhafen regiment was engaged in a firefight on the left. On the right, successive Rosish charges brought about most of the few massed infantry melees we resolved in accordance with Charge! rules all weekend, and the constricted area kept the attackers numerical superiority from weighing too heavily on the defenders in any one melee, though the defenders were worn down as the attacks went on.
Rosish colonel exhorting his men to try one more time
On the left on the position, superior numbers and the eventual deployment of a battery of artillery made the situation very hot for the von Nordhafen regiment. The S-B gun attempted to get off one shot too many and was overrun.
Chargers reach the gun position
However, fire from the infantry ensconced in a covered position behind the hedgerow proved to be too much for the already battered Rosish regiment, and they withdrew, unfortunately not without the gun. As a second line was coming up behind them, the situation remained grim, and the defenders began to doubt that the sun would set on a Pragmatically-held village.
A final push by the attackers
As the sun set (or turn 10 ended, depending on your point of view), the von Nordhafen regiment was reduced below strength and compelled to retire. Their standard was taken, and they fell back from their position in the stone house and the white house. Troops of the Adelmann regiment were gamely rallying after the series of assaults, and they continued to hold the thatched house and the adjacent orchard, which would feature significantly in the next action...
Elevated view around turn 8
The game was judged a draw, with the Northern Alliance in control of the majority of the town, but not in control of the bridge. Interestingly, this is the "book" situation when scenario 5 is to be played as a stand-alone situation. As a gamemaster, I found this to be a tense and exciting scenario, with a number of incidents which could have altered the end situation considerably. (The slightly late timing of the withdrawal of the SB gun, for example...) This was a reminder that the satisfaction produced by a game is not necessarily in proportion to the number of troops involved. This game could have been played on my 5x6 home table, so I really ought to work on a few limited scenarios to keep me interested until the next major gathering.


Looks and sounds like a very successful little battle.
ReplyDelete-- Jeff
Those proud regiments deserve to be better known individually: would the two opponents regale us (from locations securely apart, of course!) with a parade or some form of 'trooping the colours'?
ReplyDeleteA superb action! Just by the way, I was particularly taken with the 6th picture, looking down the road as the Rosish Colonel exhorts his troopers... A very 'roadish' sort of road - a great piece of photography as well as terrain design.
ReplyDeleteCheers,
Ion
It's one of the Prince's shots; he'll be glad to hear you say so. (I quite agree.) Ross introduced me to the road system some years ago; we simply spread sand on the felt. What we can't pick up easily at the end of the game gets taken outside and shaken off. The color has to be right, though; for this one I have a special bag of Nova Scotia traction sand. My local sand is all way too yellow, though it complements my brown felt for things like Darkest Africa scenarios.
ReplyDeleteI wouldn't call my experiences with the von Nordhafen regiment 'disasters' exactly--they just have a tendency to die to the last man while under my command. But given that that's what they did here, maybe it's them, not me.
ReplyDeleteGreat looking battle game, lovely to see 40mm figs in action.
ReplyDelete-- Allan